Aim 🎯
In this tutorial we will build a simple Positive Quote App using React and Appwrite. This app will show list of positive quotes to user only if the user is logged in . We will be implementing email and password based authentication with our library react-appwrite-auth-ui .
Youtube Tutorial
The source code for this tutorial is available here on Github .
Project Structure 📂
Pages
Our App consists of 3 pages
SigninPage: This page will be used to sign in the user with email and password.SignupPage: This page will be used to sign up the user with email and password.Homepage: This page will be used to show the list of positive quotes to the user.
Components
The components used in our app are :
Header: This component will be used to show the header of our app. This component will show sign out to user if user is logged in else it will show sign in .Quotes: This component will be used to show the list of quotes to the user. This component will be rendered on Homepage if user is logged in else not .
Styling
All out app styles will be in single file index.css .
Since the aim of this project is not teaching css. You can copy all the css from here and paste it into index.css .
index.css
@import url('https://fonts.googleapis.com/css2?family=Lato:wght@300;400;700&display=swap');

*,*::after,*::before{
  padding: 0;
  margin: 0;
  box-sizing: border-box;
}

body{
  min-height: 100vh;
  font-family: 'Lato', sans-serif;
  color: #eee ;
  background: linear-gradient(112.1deg, rgb(32, 38, 57) 11.4%, rgb(63, 76, 119) 70.2%);
}

.link {
  color: rgb(95, 200, 241);
}

.navbar__container{
  display: flex;
  justify-content: space-between;
  align-items: center;
  padding: 1rem 2rem;
}

.navbar__logo{
  font-size: 1.5rem;
  font-weight: 700;
  text-decoration: none;
}

.navbar__link {
  border: 1.5px solid white;
  font-weight: 500;
  padding: 0.5rem 1rem;
  border-radius: 8px;
  transition: all 0.2s ease-in;
}

.navbar__link:hover{
  background: #eee;
  color: #000;
}

.loading__page {
  display: grid;
  place-items: center;
  z-index: 11;
  position: fixed;
  background-color: #333;
  left: 0;
  right: 0;
  top: 0;
  bottom: 0;
}

.loading__section{
  display: flex;
  row-gap: 2rem;
  flex-direction: column;
  justify-content: center;
  align-items: center;
}

.loading__text {
  font-size: 1.9rem;
  font-weight: 500;
}

.loading__spinner {
  color: #ffffff;
  font-size: 45px;
  text-indent: -9999em;
  overflow: hidden;
  width: 1em;
  height: 1em;
  border-radius: 50%;
  position: relative;
  transform: translateZ(0);
  animation: mltShdSpin 1.7s infinite ease, round 1.7s infinite ease;
}

@keyframes mltShdSpin {
  0% {
    box-shadow: 0 -0.83em 0 -0.4em,
    0 -0.83em 0 -0.42em, 0 -0.83em 0 -0.44em,
    0 -0.83em 0 -0.46em, 0 -0.83em 0 -0.477em;
  }
  5%,
  95% {
    box-shadow: 0 -0.83em 0 -0.4em,
    0 -0.83em 0 -0.42em, 0 -0.83em 0 -0.44em,
    0 -0.83em 0 -0.46em, 0 -0.83em 0 -0.477em;
  }
  10%,
  59% {
    box-shadow: 0 -0.83em 0 -0.4em,
    -0.087em -0.825em 0 -0.42em, -0.173em -0.812em 0 -0.44em,
    -0.256em -0.789em 0 -0.46em, -0.297em -0.775em 0 -0.477em;
  }
  20% {
    box-shadow: 0 -0.83em 0 -0.4em, -0.338em -0.758em 0 -0.42em,
     -0.555em -0.617em 0 -0.44em, -0.671em -0.488em 0 -0.46em,
     -0.749em -0.34em 0 -0.477em;
  }
  38% {
    box-shadow: 0 -0.83em 0 -0.4em, -0.377em -0.74em 0 -0.42em,
     -0.645em -0.522em 0 -0.44em, -0.775em -0.297em 0 -0.46em,
     -0.82em -0.09em 0 -0.477em;
  }
  100% {
    box-shadow: 0 -0.83em 0 -0.4em, 0 -0.83em 0 -0.42em,
    0 -0.83em 0 -0.44em, 0 -0.83em 0 -0.46em, 0 -0.83em 0 -0.477em;
  }
}

@keyframes round {
  0% { transform: rotate(0deg) }
  100% { transform: rotate(360deg) }
}

.quote__list{
  padding: 1em 1.5em;
  margin: 1em;
  border-radius: 8px;
  display: grid;
  row-gap: 0.5em;
  background-color: rgb(250, 242, 242);
}

.quote__item {
  font-size: 0.8rem;
  font-family: cursive;
  color: #333;
}

/* CSS Utility classes */
.h-screen{ height: 100vh; }
.grid-center{ display: grid; place-items: center; }
Before getting started
Please make sure you have appwrite backend server running fine . If you dont know to how to do that, check out the installation guide for appwrite .
Now , lets start building our app 🏃♂️💨
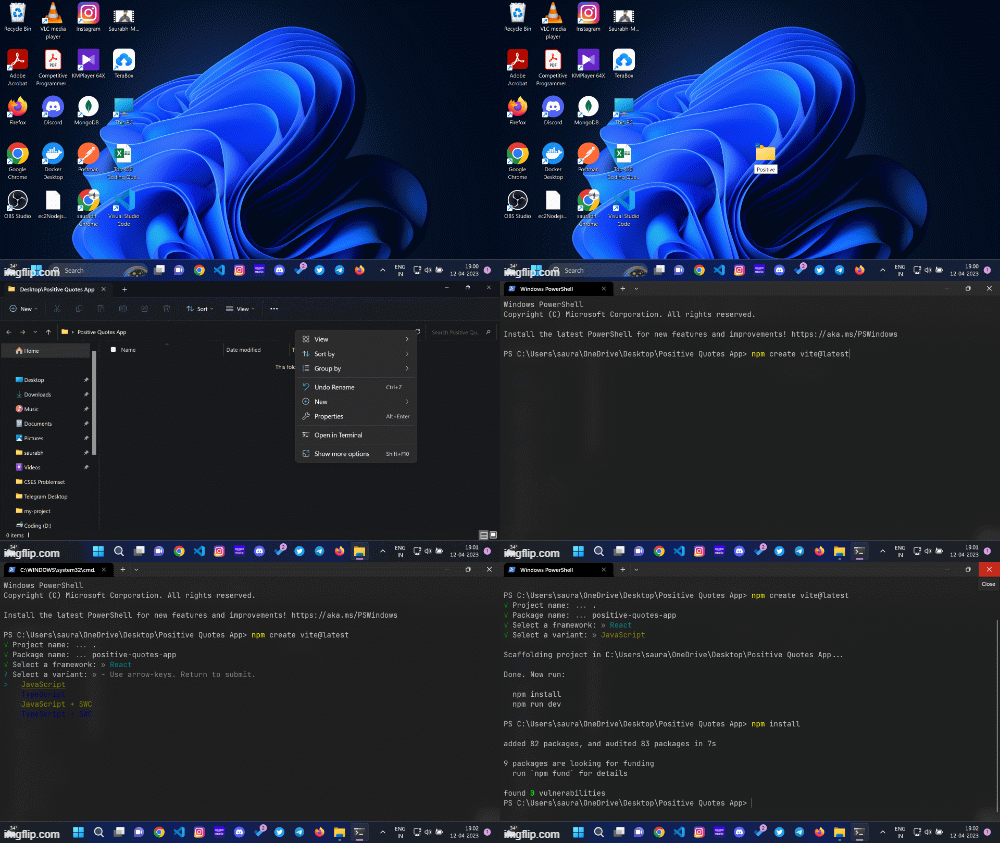
Step 1.Install React App with Vitejs

- Select a destination where you want to create your project and run the following command to create a new react app with vitejs .
npm create vite@latest
Follow the prompt and answer the following questions :
2.1 Choose your project name .
Note: this will be the name of the subfolder created by vitejs containing your react app . Enter
.to create project in current folder .2.2 Select
Reactas framework withJavascriptas variant.Move to the folder where your project is created and run the following command to install the dependencies for your newly created react app .
npm install
Now, your project directory should look like this :
|-node_modules
|-public
|   |--- vite.svg
|
|-src
|   |--- assets
|   |       |--- react.svg
|   |
|   |--- App.css
|   |--- App.jsx
|   |--- index.css
|   |--- main.jsx
|
|-.gitignore
|-index.html
|-package-lock.json
|-package.json
|-vite.config.js
Step 2. Build Folder Structure and refactor code
All our css will reside in single file index.css in src folder .
Since the aim of this project is not teaching you css , replace css code from here on github with existing css in
index.css.Clean all code inside
App.jsxand replace the code with simple React Component that rendersHello Worldon screen :App.jsx
import React from "react"

export default function App() {
  return <div> Hello world </div>
}
Remove
assetsfolder andApp.cssfile fromsrcfolder since they are not required anymore .Create folders named
componentsandpagesinsidesrcfolder .Inside components folder create React components
Header.jsxandQuotes.jsx.Header.jsx
import React from 'react'

export default function Header(){
  return <div>Header</div>
}
Quotes.jsx
import React from 'react'

export default function Quotes(){
  return <div>Quotes</div>
}
Inside pages folder create React components
HomePage.jsx,SigninPage.jsxandSignupPage.HomePage.jsx
import React from 'react'

export default function HomePage(){
  return <div>HomePage</div>
}
SigninPage.jsx
import React from 'react'

export default function SigninPage(){
  return <div>SigninPage</div>
}
SignupPage.jsx
import React from 'react'

export default function SignupPage(){
  return <div>SignupPage</div>
}
Inside
srccreate a file namedpositiveQuotes.jsfrom which we will default export array of positive quotes where each quotes object hasidandtextfield . Paste positive Quotes from here on github .
Now, the folder structure should look like this :
|-node_modules
|-public
|   |--- vite.svg
|
|-src
|   |--- components
|   |       |--- Header.jsx
|   |       |--- Quotes.jsx
|   |
|   |--- pages
|   |       |--- HomePage.jsx
|   |       |--- SigninPage.jsx
|   |       |--- SignupPage.jsx
|   |
|   |--- App.jsx
|   |--- index.css
|   |--- main.jsx
|   |--- positiveQuotes.js
|
|-.gitignore
|-index.html
|-package-lock.json
|-package.json
|-vite.config.js
Step 3. Setup Routing
Since there are multiple pages in our app we will setup our routes with react-router-dom .
Install
react-router-dompackage from npm .npm install react-router-domSetup BrowserRouter in
main.jsxand setup Routes inApp.jsxmain.jsx
import React from 'react'
import ReactDOM from 'react-dom/client'
import App from './App'
import './index.css'
import { BrowserRouter } from 'react-router-dom'

ReactDOM.createRoot(document.getElementById('root')).render(
  <BrowserRouter>
    <React.StrictMode>
      <App />
    </React.StrictMode>
  </BrowserRouter>
)
App.jsx
import { Routes, Route } from "react-router-dom"
import HomePage from "./pages/HomePage"
import SigninPage from "./pages/SigninPage"
import SignupPage from "./pages/SignupPage"

function App() {

  return (
    <Routes>
      <Route path="/" element={<HomePage />} />
      <Route path="/sign-in" element={<SigninPage />} />
      <Route path="/sign-up" element={<SignupPage />} />
    </Routes>
  )
}

export default App
Step 4. Add AppwriteAuthUIProvider to App
- Install Appwrite web SDK , react-appwrite-auth-ui UI library and pink design css packages from npm .
npm install appwrite @appwrite.io/pink react-appwrite-auth-ui
Inside
main.jsxdo these tasks :I. import pink design from
@appwrite.io/pink.
II. CreateClientandAccountinstance usingappwritelibrary .Client instance will requireprojectIdandendPoint, you can get both from overview section in settings inside appwrite console for your project .
III. Pass these instances as props toAppwriteAuthUIProvidercomponent .
IV. WrapAppcomponent withAppwriteAuthUIProvider.main.jsx
import React from 'react'
import ReactDOM from 'react-dom/client'
import App from './App'
import './index.css'
import '@appwrite.io/pink'
import { BrowserRouter } from 'react-router-dom'

import {Client,Account} from "appwrite"
import { AppwriteAuthUIProvider } from 'react-appwrite-auth-ui'

const endpoint = "http://localhost:4321/v1" // YOUR API ENDPOINT
const projectId = "63ff40968cfee425c0ac"  // YOUR PROJECT ID

const client  = new Client().setProject(projectId).setEndpoint(endpoint)
const account = new Account(client)

ReactDOM.createRoot(document.getElementById('root')).render(
  <BrowserRouter>
    <AppwriteAuthUIProvider client={client} account={account}>
      <React.StrictMode>
        <App />
      </React.StrictMode>
    </AppwriteAuthUIProvider>
  </BrowserRouter>
)
  )
You have successfully setup the library .
Step 5. Building components
Header: The header component usesuseAuthenticatedUserhook to get the authenticated user andSignoutButtoncomponent to signout the user . If the user is not authenticated then it will show a link to sign in page .Header.jsx
import React from 'react'
import { SignoutButton, useAuthenticatedUser } from 'react-appwrite-auth-ui'
import { Link , useNavigate } from 'react-router-dom'

const Header = () => {
const {loading,error,user} = useAuthenticatedUser()
const navigate = useNavigate()

const handleSignoutSuccess = () => {
  navigate('/sign-in')
}

return (
  <nav className='navbar__container'>
    <h3 className='navbar__logo'>Positive Quotes</h3>
    { (!loading && !error && user) ?
    (<SignoutButton
      onAuthError={(error) => {alert(error)}}
      onAuthSuccess={ handleSignoutSuccess }
      >Sign out</SignoutButton>) :
    <Link className='navbar__link' to="/sign-in">Sign in</Link>}
  </nav>
)
}

export default Header
2.
Quotes: The Quotes component renders a collection of quotes from positiveQuotes.js.Quotes.jsx
import React from "react"
import positiveQuotes from "../positiveQuotes"

const Quotes = () => {
  return <div className="quote__list">
    {positiveQuotes.map((quote,idx) => <p key={quote.id} className="quote__item">
      {idx+1}. {quote.text}
    </p>)}
  </div>
}

export default Quotes
Building Pages
1.Homepage: This page calls the useAuthenticatedUser hook. If the hook returns a loading state, it returns a loading component. If the hook returns an error, it redirects the user to the sign-in page. Otherwise, it returns the page with the header and the quotes component.
Homepage.jsx
import React from 'react'
import Header from '../components/Header'
import { useAuthenticatedUser } from 'react-appwrite-auth-ui'
import { Navigate } from 'react-router-dom'
import Quotes from '../components/Quotes'

const HomePage = () => {
  const {user,loading,error} = useAuthenticatedUser()

  if(loading){
    return <div className='loading__page'>
      <div className="loading__section">
        <span className="loading__spinner"></span>
        <h3 className='loading__text'>Loading...</h3>
      </div>
    </div>
  }

  if(error){
    return <Navigate to='/sign-in' />
  }

  return (<div>
    <Header />
    {!user ?
      <section className='unauthorized__section'>You must login to see quotes</section> :
      <Quotes />
    }
  </div>)
}


export default HomePage
2.SigninPage: Use the EmailSigninForm component to render a form that allows users to sign in with their email and password. The component takes the email and password as props. It also takes two callbacks, onAuthError and onAuthSuccess. The onAuthError callback is called when the user fails to sign in. The onAuthSuccess callback is called when the user successfully signs in.
SigninPage.jsx
import React from 'react'
import { Button, EmailSigninForm, FormControl, FormList } from 'react-appwrite-auth-ui'
import { Link, useNavigate } from 'react-router-dom'

const SigninPage = () => {
  const [email, setEmail] = React.useState("")
  const [password, setPassword] = React.useState("")

  const navigate = useNavigate()

  const onAuthError = (error) => {
    alert('user login failed 💔')
  }

  const onAuthSuccess = (response) => {
    console.log('user login successful')
    navigate('/')
  }

  return (
    <div className='h-screen grid-center'>
      <EmailSigninForm
        email={email}
        password={password}
        onAuthError={onAuthError}
        onAuthSuccess={onAuthSuccess}
      >
        <FormList>
          <FormControl
            label='Email'
            type='email'
            theme="dark"
            value={email}
            onChange={(e) => setEmail(e.target.value)}/>
          <FormControl
            label='Password'
            type="password"
            theme="dark"
            value={password}
            onChange={(e) => setPassword(e.target.value)}/>
        </FormList>
        <Link className='u-margin-block-start-8 link' to='/sign-up'>Don't have an account yet ? Signup instead .</Link>
        <Button type='submit' className='u-margin-block-start-16' > Sign in </Button>
      </EmailSigninForm>
    </div>
  )
}

export default SigninPage
3.SignupPage: Use the EmailSignupForm component to render a form that allows users to sign up with their email and password. The component takes the email, password, and name as props. It also takes two callbacks, onAuthError and onAuthSuccess. The onAuthError callback is called when the user fails to sign up. The onAuthSuccess callback is called when the user successfully signs up.
SignupPage.jsx
import React from 'react'
import { Button, EmailSignupForm, FormControl, FormList } from 'react-appwrite-auth-ui'
import { Link, useNavigate } from 'react-router-dom'

const SignupPage = () => {
  const [email, setEmail] = React.useState("")
  const [password, setPassword] = React.useState("")

  const navigate = useNavigate()

  const onAuthError = (error) => {
    alert('user creation failed 💔')
  }

  const onAuthSuccess = (response) => {
    alert('user created successfully')
    navigate('/')
  }

  return (
    <div className='h-screen grid-center'>
      <EmailSignupForm
        email={email}
        password={password}
        onAuthError={onAuthError}
        onAuthSuccess={onAuthSuccess}
      >
        <FormList>
          <FormControl
            label='Email'
            type='email'
            value={email}
            theme='dark'
            onChange={(e) => setEmail(e.target.value)}/>
          <FormControl
            label='Password'
            type="password"
            value={password}
            theme='dark'
            onChange={(e) => setPassword(e.target.value)}/>
        </FormList>
        <Link className='u-margin-block-start-8 link' to='/sign-in'>Already have an account ? Signin instead .</Link>
        <Button type='submit' className='u-margin-block-start-16' > Sign up </Button>
      </EmailSignupForm>
    </div>
  )
}

export default SignupPage
Congrats 🎉🍾🎊
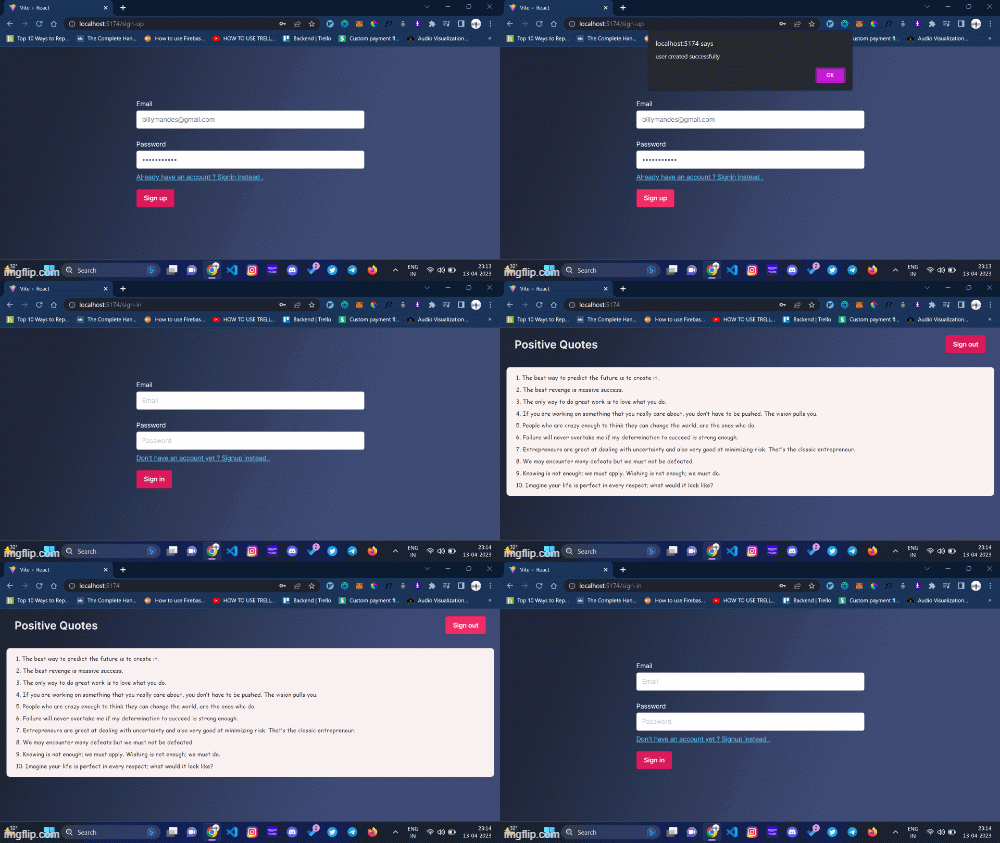
You have successfully build the App . The app looks like this:

You can view the source code for this project on Github .
